|
|
Steam Locomotive Surveys for Restoration: A Progressive Approach |
|
text and photos by Dave Lathrop |
Over the past two decades I've had occasion to survey collections of steam locomotives to determine which could be the best candidate for operating restoration; to locate a restorable locomotive among several possible candidates and estimate probable restoration costs; and to provide cost estimates for restoration of a specific locomotive. Here follow three case studies that show the methods I use to make these determinations.
I was hired by a gentleman who was a principal in a Texas shortline, who wished to find a steam locomotive for use on his railroad. He had worked with other inspectors before, and had considered several possible locomotives. None of the engines located so far had seemed a good fit from his point of view.
My first course of business was to consider what type of locomotive best suited his needs. His railroad was low speed, jointed rail, without turning facilities. His operating plan was to offer steam experience courses doing old-time setouts and pickups, with the occasional passenger train excursion. His shop facilities were minimal. Based on these factors, we set criteria for the desired engine: nothing larger than a small 2-8-2 or smaller than a U.S. Army 0-6-0, preferably an oil burner, fairly small drivers, and outside valve gear.
Having found some locomotives that met these criteria, we planned three trips - one to Pennsylvania and New York, one to Colorado, one to New England. Time available for hands-on survey of each locomotive was at most half a day, so the inspection assessed only general condition and completeness, with special attention to finding any obvious, expensive, red-flag conditions that would eliminate a candidate from consideration. Seller's attitude and estimated acquisition costs also entered the equation, but that wasn't my department - I was just there to provide technical advice on current condition, estimated restoration costs, and estimated moving costs.
I won't go into the comic opera which followed; suffice it to say, there wasn't much time to form opinions. If you find yourself in similar circumstances, here's the methodology I followed.
My approach is, first, to walk around and get a general impression of what is still there and visible, and what if anything is obviously missing. Does the engine appear cared for? Was it recently in use? Are there signs of fresh lubrication? Obvious missing components? Are joints loose and leaky or tight and smooth?
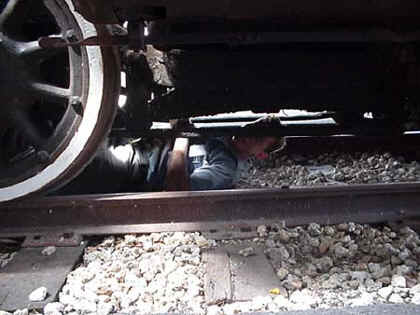
Second comes a more thorough external inspection of the running gear. What are the wheel profiles and tire thicknesses? How much meat is left on the journals? Are the cylinders or saddle cracked or banded? Rods bent, welded up, or missing? Spring rigging cracked, loose, or wobbly? Does the frame appear essentially straight? Is the frame working in the saddle?
 |
|
Taking a close look at the pilot truck. |
Third, if the boiler is naked, comes an external inspection with an eye to forming a general impression. If the boiler is jacketed this step may not be possible, with major implications for the total accuracy of the inspection. Not only will the restoration cost estimate be increased by asbestos abatement, you will also be left with a critical unknown factor--boiler thickness--which can be extremely costly to remedy.
Do the best you can. Take a few UTs if and where you can. Remove some washout plugs and see what the stays and innards look like: eroded, scaly, clean and crisp threads, undercutting, etc.
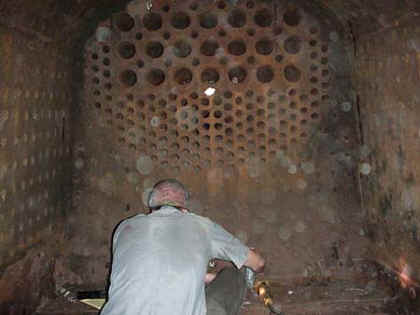
Open the firedoor and smokebox, don boiler suit and crawl in. The most likely costly deterioration in the smokebox is to be found at the bottom of the front tube sheet. Look at the steam pipes, ground in joints, superheaters (if applicable). Rusted smokebox or liner material isn't a very expensive job, so don't sweat that too much; we're more interested in the pressure vessel components. In the firebox, look at the straightness of the side and crown sheets, edges of the seams, staybolt ends, and all around at grate level. Look for cracks at the knuckles, tube ligaments, and from rivet holes to the edges of the plates. Take a few UT readings at the "usual suspect" areas, or any that seem deteriorated.
 |
|
Inside the belly of the beast: inspecting the firebox. |
At this point, your time is almost up, and all you can do to finish the fast survey is list any missing or unusable parts and put some very rough ideas and numbers together.
In the second case study, the Roundhouse Railroad Museum in Savannah, Georgia, my job was to decide which engine to restore, and to give rough cost estimates for the top candidates. I had about one day to survey per engine.
In a case like this, in addition to all the steps outlined above, I extend the process to include opening up the cylinders and valve chests, dropping rods and cellars, and a more intensive UT program. The two leading candidates both had jacketed boilers; fortunately, the best of the two proved to have a good boiler shell once the jacket was removed and asbestos abated, making it possible to do an in-depth inspection of the boiler.
This seems a good time to bring up a salient point - how much repairing to recommend. Consider the intensity of the operating program you are restoring to support. If you are Durango and Silverton, you need to restore to better-than-new condition, since you will want two years of intensive service from your power before any heavy work should be required. If you are like the Roundhouse Railroad Museum in Savannah, with fireups a few times a year and running room limited to the 40 yards or so around the turntable, a 30% worn wheel profile will last for years to come. Is it worth spending money to turn the wheels now, or should we use up the remaining life of the profile before making the investment? Georgia Power paid for the profile life we are using now back in the 1950's, and, with a drop table available on site, driver removal at some future date won't cost much. Consider how these sort of tradeoffs are most sensibly applied in your case.
In the third case study, my current project in Alabama, I have a client who had already invested heavily with another contractor. This fellow disappeared a decade ago, leaving the job half done. To make things worse, some of the work he did do actually made things worse. He had axles turned to condemning limits, did pad welding on the boiler shell well in excess of the allowable quantity, and didn't document the beginning thickness of any pad welded areas. The documentation he left is sketchy at best. On the other hand, the running gear was trammed like a Swiss watch, and the new tender tank is a work of art. Go figure… .
After a half a day of initial visual inspection and reading through what documentation there was, starting from scratch seemed the best recourse. The client was not thrilled with the idea of pulling out his new tubes with one day of test-firing on them, but since he proposes to operate on regulated rail, there is no option other than to do all work need to comply with Part 230 standards, including a new boiler survey and Form 4.
The client felt as if he had been taken advantage of, and was very sensitive to additional surprises. I therefore decided to take the survey one step at a time, informing him of the results at the end of each phase so he can decide whether or not to proceed with the next.
Step one was an initial visual and basic measuring devices survey. A day and a half was spent just figuring out what parts were there and how many of them were useful. Since many parts were stacked on pallets around the plant, and lots of parts from other locomotives share the space, this was not an easy task. After this initial phase, I submitted a report and invoice with a recommendation that the next phase would be a comprehensive external boiler shell survey at his discretion.
He wasn't scared of the conditions found to that point, so I next spent a couple days doing an external survey of the boiler shell, firebox, and smokebox. Again, I invoiced with a report and recommended removing the tubes and doing an internal as a next step, with the option of starting to do Form 4 calculations at the same time to check for critical conditions. He decided to proceed. I have just concluded that part of the process, and am working on developing plans and estimates for boiler repairs from 3 experienced and highly qualified suppliers at this time.
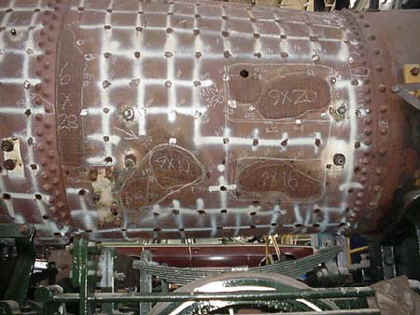 |
| Comprehensive external boiler shell survey; boiler gridded off for UT testing. |
Taking things step-by-step provided this client with notice of any adverse conditions so he could decide whether to spend additional money on further work. The client feels much more in control, and is secure in the knowledge that he isn't being taken advantage of. The job is progressing one rational step at a time at his discretion, and each phase has been paid for upon completion. Applying this step-by-step management strategy, with frequent milestones at which Go/No Go decisions are made, could provide an equally rational and cost-effective basis for restoration surveys at railroad museums as well.
Here's one possible list of milestones, with the work to be completed in each phase:
1. Initial survey. Gain an understanding of the overall condition and completeness of the locomotive in question, and to check for obvious expensive "red flags". This can be done without a pit, although the better the access, the better the information. It should include smokebox and firebox inspections, but may or may not use UT testing or require any further disassembly.
2. Mechanical survey. Gain an understanding of the mechanical condition of the running gear before making a commitment to asbestos abatement costs. Drop rods and cellars, open cylinders and valves, look at wear patterns, etc. How much tire, axle, and bearing meat remains? Are you going to have to plan on costly replacement of tires or axles or crankpins? If any of these heavy expense items are YES, estimate costs and make decisions accordingly.
3. External boiler survey. Grid out and UT test the accessible surfaces of the boiler after abatement before committing to tube removal. I like to grid out no more than a 6" pitch grid and do 2 or 3 measurements in each, with closer measurement grids done in areas with obvious or discovered deterioration. The result should show in general terms how much material is left in your boiler. Retest until you understand completely what you have to work with.
4. Internal boiler survey. Remove tubes and completely inspect internal surfaces and components of the boiler for "red flags" before proceeding to Form 4 calculations and measurements. It will be easy to see any cracked or eroded braces, etc. We assume at this stage that the locomotive's manufacturer built the boiler to ASME or other applicable standards; what we are interested in is subsequent damage. If your crown and tube sheets look like a relief map of Colorado, this may be an excellent time to consider the cost of a new firebox. If the stays are reduced body, you may want to run a calculation to determine whether or not the load on them will exceed allowable tolerances once the telltales have been drilled past the fillet into the reduced section as the new code requires.
5. Form 4 measurements and calculations. The goal is to do all necessary measurements and calculations to develop a Form 4 for your boiler in "as is" condition. This will make obvious any areas of noncompliance or areas of marginal thickness where repairs will need to be made. Plan on hating this job unless you are a natural mathematician, but after working through it you will have an understanding of boiler stresses and how they are carried that you never had before. It is worth doing for that reason alone.
6. Repair specs and estimates for your boiler and running gear. Work with reputable and experienced repair providers to develop plans and cost estimates for the work requirements established during the previous phases, and realistically assess your in-house capabilities. Take the samples and carry out the required metallurgical tests on your boilerplate. Recalculate the nonconforming portions of the "as is" Form 4 to reflect the "as repaired" new values based on these plans and specs.
After carrying out these 6 steps in the survey process, you should have a rational basis on which to decide whether to continue repair or restoration. You will have decided six times whether results to date support continuing to invest in potential restoration. Each additional step costs money not only to undertake, but also to reverse if you later decide to abandon operating restoration and commit to cosmetic restoration.
Aside from the items in this six-step survey, additional expenses to be budgeted for include sheet metal and paint, new lagging, whatever tender work is necessary, appliance rebuilding (call Bernie Watts for estimates assuming general rebuild), draft gear work, air brake valve overhaul, the usual endless list of small things. Is the piping useable or will you need to replace it? Do you need new code safety valves? And so on.
No matter how detailed you get in the survey and cost estimation, an unpleasant surprise can arise at any time. Georgetown Loop once had a wheel center that looked perfect, yet split when the tire was removed. Understand that in surveying you are doing the best you can to anticipate future costs from what you know, but be prepared to learn things you didn't want to know from time to time.
This is just one possible approach to surveying a steam locomotive. It may or may not apply to your specific situation, or work logistically in your circumstances. Please, anybody who has other techniques, write them up and share them, and let us know how they work for you.